Ibex [Boss]


#1

Primordial%20Oryx%20Stand%20(Swordless)

Ibex


It is written:

It is Omnipresent, sentient since the Beginning of Time, though its actual origins are unknown. All that is known about it is; it is the primordial Incarnation of what...He embodies. Its power was imbued upon Him, turning Him deranged with the intense thew that the beast possessed.
The inevitable end to the Realms as we know it lie in the eyes of the beast. It is said that those who dare to look into its eyes will see the manner in which the existence of the Realms are finally concluded.


Frames

Regular Frames:
Ibex%20Run%20(No%20Swords) Ibex%20All%20Frames%20(One%20Sword) Ibex%20All%20Frames%20(Two%20Swords)

Recovery Frames:
Ibex%20Recovery%20(No%20Swords)Ibex%20Recovery%20(One%20Sword) Ibex%20Recovery%20(Two%20Sword)


Contents

  • Stats
  • Combat
  • Drops
  • Tips


Stats

HP: 700,000 (+15% [105,000 HP] per player within a 30 Tile radius)
DEF: 75
EXP: 1,000,000
Location: TBC

  • Immune to Armor Broken
  • Immune to Dazed
  • Immune to Paralyze
  • Immune to Petrify
  • Immune to Stasis
  • Immune to Slow
  • Immune to Stun
  • Immune to Weak
  • Level 1 Quest
  • Counts toward God Kills
  • Counts toward Oryx Kills


Combat

Attacks

Aesthetics Name Damage Range Speed (Tiles/sec) Lifetime (Milliseconds) Effects Comments
HoofPrint Hoof Print 175 0 0.0 5000 SlowedSlowed & ExposedExposed for 5 seconds N/A
MoltenHoofPrint Molten Hoof Print 225 0 0.0 5000 SlowedSlowed & Armor BrokenArmor Broken for 5 seconds N/A
HoofStomp Hoof Stomp 75-105 2.5 2.5 500 N/A N/A
PetrifyingStomp Petrifying Stomp 90 8 7.5 600 ParalyzedParalyzed for 1.5 seconds Multihit Shots Hit Multiple Targets
DefenseIgnore Ignores Player Defense
KneeborneQuake Knee-borne Quake 75 2.5 2.5 500 N/A SlowedSlowed & ConfusedConfused for 3 seconds
PrimordialSmallShield Primordial Small Shield 90 11.34 9.0 630 N/A N/A
PrimordialLargeShield Primordial Large Shield 270 5.67 4.5 630 N/A N/A
LargeBeastlyShockwave Large Beastly Shockwave 175 7.2 3.0 600 N/A DefenseIgnore Ignores Player Defense
MLargeBeastlyShockwave Medium-Large Beastly Shockwave 160 6.6 2.75 600 N/A DefenseIgnore Ignores Player Defense
MSmallBeastlyShockwave Medium-Small Beastly Shockwave 145 6 2.5 600 N/A DefenseIgnore Ignores Player Defense
SmallBeastlyShockwave Small Beastly Shockwave 130 5.4 2.25 600 N/A DefenseIgnore Ignores Player Defense
CombinedMoltenShockwave Combined Molten Shockwave 200 4.5 1.25 1800 ParalyzedParalyzed for 2.4 seconds Multihit Shots Hit Multiple Targets
LargeMoltenWave Large Molten Wave 175 7 7.625 459 N/A Multihit Shots Hit Multiple Targets
MediumMoltenWave Medium Molten Wave 150 6.1 6.65 459 N/A Multihit Shots Hit Multiple Targets
SmallMoltenWave Small Molten Wave 125 5.23 5.7 459 N/A Multihit Shots Hit Multiple Targets
MiniMoltenWave1 Mini-Molten Wave 1 90-110 2.7 4.5 300 N/A Multihit Shots Hit Multiple Targets
MiniMoltenWave2 Mini-Molten Wave 2 130-160 2.7 3.75 360 N/A Multihit Shots Hit Multiple Targets
MoltenCircle Molten Circle 75 9.6 3.0 1600 SlowedSlowed for 3.75 seconds Rotation: 100
Multihit Shots Hit Multiple Targets
MoltenSphere Molten Sphere 150 2 1.0 100 WeakSlowed for 5 seconds Rotation: 50
Multihit Shots Hit Multiple Targets
Parametric Parametric
MoltenBolt Molten Bolt 135 27 6.75 2000 ParalyzedParalyzed for 0.5 seconds Multihit Shots Hit Multiple Targets
DefenseIgnore Ignores Player Defense
LeftSwordSlash Left Sword Slash 675 7.56 7.0 540 N/A Multihit Shots Hit Multiple Targets
RightSwordSlash Right Sword Slash 675 7.56 7.0 540 N/A Multihit Shots Hit Multiple Targets
DoubleEdgeSSlash Double Edge Sword Slash 450 6.3 5.25 300 BleedingBleeding for 8 seconds Amplitude: 0.75 Tiles
Frequency:1 Cycle(s)/Shot
BladeFaceSlap Blade-Face Slap 450 6.3 10.5 300 N/A Amplitude: 1.25 Tiles
Frequency:0.5 Cycle(s)/Shot
LargeLeftSwordTrail1 Large Left Sword Trail 1 120 3.9 1.95 100 N/A Multihit Shots Hit Multiple Targets
Offset X: 6
- Always shot from a 90o angle from boss' intended direction
LargeLeftSwordTrail2 Large Left Sword Trail 2 120 3.12 1.95 80 N/A Multihit Shots Hit Multiple Targets
Offset X: 5
- Always shot from a 90o angle from boss' intended direction
SmallLeftSwordTrail1 Small Left Sword Trail 1 95 2.34 1.95 60 N/A Multihit Shots Hit Multiple Targets
Offset X: 4
- Always shot from a 90o angle from boss' intended direction
SmallLeftSwordTrail2 Small Left Sword Trail 2 95 1.56 1.95 40 N/A Multihit Shots Hit Multiple Targets
Offset X: 3
- Always shot from a 90o angle from boss' intended direction
LargeRightSwordTrail1 Large Right Sword Trail 1 120 3.9 1.95 100 N/A Multihit Shots Hit Multiple Targets
Offset X: 6
- Always shot from a 270o angle from boss' intended direction
LargeRightSwordTrail2 Large Right Sword Trail 2 120 3.12 1.95 80 N/A Multihit Shots Hit Multiple Targets
Offset X: 5
- Always shot from a 270o angle from boss' intended direction
SmallRightSwordTrail1 Small Right Sword Trail 1 95 2.34 1.95 60 N/A Multihit Shots Hit Multiple Targets
Offset X: 4
- Always shot from a 270o angle from boss' intended direction
SmallRightSwordTrail2 Small Right Sword Trail 2 95 1.56 1.95 40 N/A Multihit Shots Hit Multiple Targets
Offset X: 3
- Always shot from a 270o angle from boss' intended direction
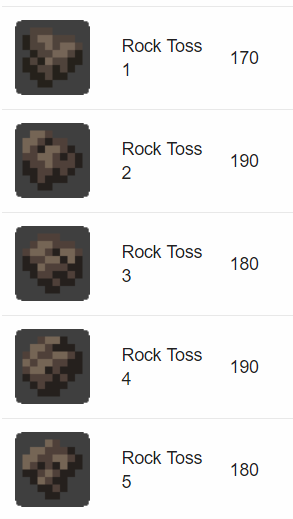
GrenadeRock1 Rock Toss 1 170 Radius: 3 Tiles N/A N/A SlowedSlowed for 5 seconds - GrenadeToss
- Explodes into 4 Rock Debris GrenadeToss
GrenadeRock2 Rock Toss 2 190 Radius: 3 Tiles N/A N/A SlowedSlowed for 5 seconds - GrenadeToss
- Explodes into 2 Rock Debris GrenadeToss
GrenadeRock3 Rock Toss 3 180 Radius: 3 Tiles N/A N/A SlowedSlowed for 5 seconds - GrenadeToss
- Explodes into 3 Rock Debris GrenadeToss
GrenadeRock4 Rock Toss 4 190 Radius: 3 Tiles N/A N/A SlowedSlowed for 5 seconds - GrenadeToss
- Explodes into 2 Rock Debris GrenadeToss
GrenadeRock5 Rock Toss 5 180 Radius: 3 Tiles N/A N/A SlowedSlowed for 5 seconds - GrenadeToss
- Explodes into 3 Rock Debris GrenadeToss
Debris1 Rock Debris 1 105 Radius: 1.5 Tiles N/A N/A ParalyzedParalyzed for 1.25 seconds - GrenadeToss
Debris2 Rock Debris 2 110 Radius: 1.25 Tiles N/A N/A ParalyzedParalyzed for 0.75 seconds - GrenadeToss
Debris3 Rock Debris 3 115 Radius: 1 Tiles N/A N/A ParalyzedParalyzed for 1 seconds - GrenadeToss
ChargeInnerAoE Charge Inner Explosion 240 Radius: 2.5 Tiles N/A N/A ConfusedConfused for 2.5 seconds (Centered on Boss)
ChargeOuterAoE Charge Outer Explosion 180 Radius: 3.75 Tiles N/A N/A UnstableUnstable for 2.5 seconds (Centered on Boss)
ConcussionAoE Concussion Bomb 0 Radius: 1 Tile N/A N/A ParalyzedParalyzed for 1 seconds (Centered on Boss)
MoltenShot Molten Shot 112.5 7.5 15000 N/A Amplitude: 2.5 Tiles
Frequency:10 Cycle(s)/Shot


Heavy Armor + 2 Rings [Drops from Ibex]
#2

Objects and Reproduction

Lightning Strike
Lightning_1 Lightning_2 Lightning_3

Contents

  • Stats
  • Combat
  • Drops
  • Tips


Stats

HP: 1,000,000
DEF: 1000
EXP: 0
Location: TBC

  • Immune to Dazed
  • Immune to Paralyze
  • Immune to Petrify
  • Immune to Stasis
  • Immune to Slow
  • Immune to Stun
  • Immune to Weak
  • Invincible (Shots will not hit/Intangible)

Combat

Attacks

Aesthetics Name Damage Range Speed (Tiles/sec) Lifetime (Milliseconds) Effects Comments
LightningStrikeAoE Lightning Strike 110 Radius: 0.75 Tiles N/A N/A WeakWeak & DazedDazed for 3.75 seconds
ParalyzedParalyzed for 0.75 seconds
DefenseIgnore Ignores Player Defense

(Enemy Entity)

  • It will appear for a split second (0.2 seconds) and simultaneously let off a Lightning Strike AoE when it appears.
  • Its behaviour is completely randomized, striking anywhere within a 20 tile radius of the center of the set piece at any time (though it has a cooldown of 20 seconds - not to be mistaken for striking every 20 seconds)
    • In the event that it strikes the Ibex, he will be forced into his recovery state (including becoming vulnerable and losing his Armored status) for 5 seconds. This means that this hazard can be quite convenient sometimes, though it can also be one of the worst random occurrences since it can halt movement for 0.75 seconds.


Primordial Fire
image0

Contents

  • Stats
  • Combat
  • Drops
  • Tips


Stats

HP: 1,000,000
DEF: 1000
EXP: 0
Location: TBC

  • Immune to Dazed
  • Immune to Paralyze
  • Immune to Petrify
  • Immune to Stasis
  • Immune to Slow
  • Immune to Stun
  • Immune to Weak
  • Invincible (Shots will not hit/Intangible)

Combat

Attacks

Aesthetics Name Damage Range Speed (Tiles/sec) Lifetime (Milliseconds) Effects Comments
SmallFlame Mini Flame 45 0 250 N/A Multihit Shots Hit Multiple Targets
DefenseIgnore Ignores Player Defense
Fire Damage 45 0 10 N/A Multihit Shots Hit Multiple Targets
DefenseIgnore Ignores Player Defense

(Enemy Entity)

  • Will spawn around the set piece and stay still.
    • Constantly fires Fire Damage projectiles, which are invisible and do not move at all
    • Occasionally throws out Mini Flame AoE’s which spawn entities that travel a shot distance and leave a trail of Small Flames behind which deal damage if walked over.


Stone Pillar
image1 / image0

Contents

  • Stats
  • Combat
  • Drops
  • Tips


Stats

HP: 1000 (+30% [840 HP] per player within a 40 Tile radius)
DEF: 25
EXP: 0
Location: TBC

  • Immune to Dazed
  • Immune to Paralyze
  • Immune to Petrify
  • Immune to Stasis
  • Immune to Slow
  • Immune to Stun
  • Immune to Weak

Combat

Attacks

Aesthetics Name Damage Range Speed (Tiles/sec) Lifetime (Milliseconds) Effects Comments
FallingPillarBlock Falling Pillar Block 90 Radius: 2 Tiles N/A N/A WeakWeak & DazedDazed for 3.75 seconds Rotation: 25

(3D object - Destructible wall)

    • Targets Boss if within 4 tile radius upon destruction.
      Makes boss vulnerable and removes Armored status for 7.5 seconds.


Left Sword
Left%20Sword%20(In%20Ground)

Contents

  • Stats
  • Combat
  • Drops
  • Tips


Stats

HP: 1,000,000
DEF: 75
EXP: 55
Location: TBC

  • Immune to Dazed
  • Immune to Paralyze
  • Immune to Petrify
  • Immune to Stasis
  • Immune to Slow
  • Immune to Stun
  • Immune to Weak
  • Invulnerable

Combat

Attacks

Aesthetics Name Damage Range Speed (Tiles/sec) Lifetime (Milliseconds) Effects Comments
SwordShockwave Sword Shockwave 225 Radius: 1.5 Tile N/A N/A BleedingBleeding for 5 seconds Amplitude: 0.75 Tiles
Frequency:1 Cycle(s)/Shot

(Centered on Left Sword)
LeftSwordSlice Left Sword Slice 60 3.75 6.25 300 N/A MultiHit Shots Hit Multiple Targets
DefenseIgnore Ignores Player Defense

(Enemy Entity)

    • AoE centered on Left Sword.


Right Sword
image0

Contents

  • Stats
  • Combat
  • Drops
  • Tips


Stats

HP: 1,000,000
DEF: 75
EXP: 55
Location: TBC

  • Immune to Dazed
  • Immune to Paralyze
  • Immune to Petrify
  • Immune to Stasis
  • Immune to Slow
  • Immune to Stun
  • Immune to Weak
  • Invulnerable

Combat

Attacks

Aesthetics Name Damage Range Speed (Tiles/sec) Lifetime (Milliseconds) Effects Comments
SwordShockwave Sword Shockwave 225 Radius: 1.5 Tile N/A N/A BleedingBleeding for 5 seconds Amplitude: 0.75 Tiles
Frequency:1 Cycle(s)/Shot

(Centered on Right Sword)
LeftSwordSlice Right Sword Slice 60 3.75 6.25 300 N/A MultiHit Shots Hit Multiple Targets
DefenseIgnore Ignores Player Defense

(Enemy Entity)

    • AoE centered on Right Sword.


Magma Energy Sphere
Magma%20Energy%20Ball%20(Deadman's%20Volley)

Contents

  • Stats
  • Combat
  • Drops
  • Tips


Stats

HP: 1,000,000 (+50% [500,000 HP] per player within a 30 Tile radius)
DEF: 0
EXP: 0
Location: TBC

  • Immune to Dazed
  • Immune to Paralyze
  • Immune to Petrify
  • Immune to Stasis
  • Immune to Stun
  • Immune to Weak

Combat

Attacks

Aesthetics Name Damage Range Speed (Tiles/sec) Lifetime (Milliseconds) Effects Comments
MoltenEnergy Molten Energy 30 3 7.5 200 ParalyzedParalyzed for 0.5 seconds MultiHit Shots Hit Multiple Targets
MoltenBlast Molten Blast 90 6 15.0 200 ParalyzedParalyzed for 2 seconds DefenseIgnore Ignores Player Defense
MoltenAoE Molten Explosion 175 Radius: 10.5 Tiles N/A N/A Armor BrokenArmor Broken for 5 seconds (Centered on Magma Energy Sphere)

#3

Boss Behaviour

The battle will take place within a confined space (on a set piece spanning a small 10.5 tiles in radius) so the battle, from start to finish, will indeed be intense.
This boss is one of few bosses in game that doesn’t have minions used within the fight. This makes the battle more raw and focussed.


Phase 1 - Beginning of the End image0image0

For the entirety of this phase the boss will be invulnerable, so the phase is pure survival to filter out weak links (phase lasts 1 minute 45 seconds (including the time it takes for the boss to stop pulsing orange)).

  • After players have reached the set piece and 30 seconds have passed since they did, fire will spawn around the outside and the surrounding tiles will transition to become lava. Ibex will emerge from the ground and slowly flash orange - which will eventually become faster - for 15 seconds.
    • The beast will then begin its assault by firing 3 waves of Large/Medium-Large/Medium-Small/Small Beastly Shockwave projectiles and the occasional radial burst of 10 Molten Circle Projectiles (which can slow players down, so it would be wise not to disregard these as they can be just as devastating as the shockwave attacks themselves).
    • Eventually the beast will change the sub-phase that it is in. During this sub-phase it will fire 1 Combined Molten Shockwave projectile, with the addition of 2 (Arc Gap: 120o) Hoof Stomp projectiles (that have a domino effect, by the use of offset projectiles:
      Wave 1 - Offset Y: 0 Tiles, Timing: 0 seconds
      Wave 2 - Offset Y: 2 Tiles, Timing: 1.6 seconds
      Wave 3 - Offset Y: 3 Tiles, Timing: 2.4 seconds
      Wave 4 - Offset Y: 3.75 Tiles, Timing: 3 seconds
      Wave 5 - Offset Y: 4.25 Tiles, Timing: 3.4 seconds
      Wave 6 - Offset Y: 4.5 Tiles, Timing: 3.6 seconds

      (Wave 6 has a radial burst of 6 Mini-Molten Wave 1 projectiles and another radial burst of 6 Mini-Molten Wave 2 projectiles (which are offset by an angle of 30o to the wave of M-MW2’s).
    • Ibex will follow players around and fire off radial bursts of 6 Primordial Small Shield projectiles quite often, and radial bursts of 3 Primordial Large Shield projectiles.

The Beast will change to and fro each sub-phase every 15 seconds

Primordial%20-%20Phase%201%20(Flash)%20Compressed


Phase 2 - The Chase image0image0
This phase will last until the boss reaches 90% HP.

  • The beast, Ibex, will then flash orange again, but this time for only 5 seconds.

  • After it stops pulsing, it will charge at players (gaining acceleration as more ground is covered) across a maximum of 10 tiles in a set direction once the closest player is targeted.
    It will constantly fire 2 (Arc Gap: 180o Molten Bolt projectiles - alternating between North (000o) and East (090o), making the shots perpendicular - every second and leave behind Hoof Print projectiles every 0.5 seconds, so it is wise to avoid getting ran onto and running directly behind him after he has charged.
    At the end of the charge, note that the boss will enter recovery and become vulnerable for attack for 5 seconds (though it will still be armored during this period).

    • Note that if Ibex ends up running into the lava around the outskirts of the set piece, the projectile trail left behind will instead change to Molten Hoof Print projectiles instead, which consequently deal more damage and cause more devastating effects to players.
  • As the phase progresses (calculated with percentage of HP remaining) it will begin throw Rock Toss AoE explosions; starting off with 1 thrown at a time, at a high rate; and then increasing in the number being thrown at a time, but with the rate decreasing eventually. (Number of Rock Toss AoE’s throw: 1 a quarter-way through the phase, and then 3 after three-quarters into the phase).


Phase 3 - Pillars of Destruction (1) image0image0
This Phase lasts until 2 out of 7 pillars are destroyed

  • It will begin this phase by following players around the arena at a close proximity for 2.5-10 seconds and then suddenly charge at the closest one without indication or warning. If any player is within a 3.75 tile range to it, it will let off a Small Shockwave Explosion and a Large Shockwave Explosion AoE (which is centered on itself) that have the combined ability to inflict Unstable and Confuse players for 2.5 seconds each.

  • Players must work together to lead the boss into charging into one of the seven pillars arounds the set piece, this means the closest player(s) to the boss must stand in front of a pillar to make him charge into one. If he collides with one of the pillars, he will enter recovery and be vulnerable for 5 seconds. At the same time the bottom block will be replaced with a destructible block that will be vulnerable for 5 seconds also. When the destructible block is eventually destroyed, a Pillar Block AoE is thrown atop the boss which causes the boss to lose its Armored status and the vulnerability will be increased by an additional 7.5 seconds (on top of the vulnerability from the boss ramming into one of the pillars, so if timed right, players can get a total of 12.5 seconds to attack the boss).
    If the phase is pulled off perfectly, players can gain a small upper hand across the battle as a whole because players can push the boss into a lengthy total of 25 seconds of vulnerability within this phase.

    • Each time players go through this phase, it will end after 2 pillars have successfully been destroyed. (So 2/7 must be destroyed in order to proceed to the next phase)
    • Note that if the boss rams into a pillar, but that pillar remains intact after the boss has been damaged, it will heal him for 750 HP and then disappear without throwing the Falling Pillar Block AoE onto him.
    • There will be one sword that is uncovered to be underneath one of the two pillars that are destroyed within this phase, that will be used on the next phase.

Phase 4 - Prophetic Blade image0image0

  • Ibex will pick up the newly uncovered sword and will chase players around the set piece while firing the Blade Face Slap projectile every so often.

  • He will eventually begin to fire 4 Knee-borne Quake projectiles and then quickly charge into the nearest player, firing 1 Left Sword Slash Projectile at them. These shots can be absolutely devastating to players as they can deal a whopping 675 damage, so it is crucial to avoid getting hit by these projectiles at all costs.

  • In the intervals between the shots, Ibex will fire a series of Large/Small Left Sword Trail (1 and 2) projectiles, these (similar to the wave of Hoof Stomp projectiles) will be offset:

    Large Left Sword Trail 1 - Offset Y: 6 Tiles, Offset X: 1 Tile
    Large Left Sword Trail 2 - Offset Y: 4.75 Tiles, Offset X: 1 Tile
    Small Left Sword Trail 1 - Offset Y: 3.5 Tiles, Offset X: 1 Tile
    Small Left Sword Trail 2 - Offset Y: 2.25 Tiles, Offset X: 1 Tile

  • A repeat of the “Hoof Stomp” sup-phase, from phase 1 will also be repeated during this phase at a random point, so players should always be aware to keep moving, otherwise they could be absorbing some enormous damage that is output from the boss.


Phase 5 - Pillars of Destruction (2) image0image0
This Phase lasts until 4 (already destroyed 2 + 2 additional pillars) out of 7 pillars are destroyed.

  • Again, it will begin this phase by following players around the arena at a close proximity for 2.5-10 seconds and then suddenly charge at the closest one without indication or warning. If any player is within a 3.75 tile range to it, it will let off a Small Shockwave Explosion and a Large Shockwave Explosion AoE (which is centered on itself) that have the combined ability to inflict Unstable and Confuse players for 2.5 seconds each.

  • Players must work together to lead the boss into charging into one of the seven pillars arounds the set piece, this means the closest player(s) to the boss must stand in front of a pillar to make him charge into one. If he collides with one of the pillars, he will enter recovery and be vulnerable for 5 seconds. At the same time the bottom block will be replaced with a destructible block that will be vulnerable for 5 seconds also. When the destructible block is eventually destroyed, a Pillar Block AoE is thrown atop the boss which causes the boss to lose its Armored status and the vulnerability will be increased by an additional 7.5 seconds (on top of the vulnerability from the boss ramming into one of the pillars, so if timed right, players can get a total of 12.5 seconds to attack the boss).
    If the phase is pulled off perfectly, players can gain a small upper hand across the battle as a whole because players can push the boss into a lengthy total of 25 seconds of vulnerability within this phase.

    • Each time players go through this phase, it will end after 2 pillars have successfully been destroyed. (So 4/7 must be destroyed in order to proceed to the next phase)
    • Note that if the boss rams into a pillar, but that pillar remains intact after the boss has been damaged, it will heal him for 1000 HP and then disappear without throwing the Falling Pillar Block AoE onto him.
    • Because of the addition to the sword to this phase, players should be aware of the 675 damage projectile being fired in their direction as this can mean instant death for players with low base or just generally low HP.

Phase 6 - Pedestal image0image0
This Phase lasts until the boss is down to 50% HP (if at 50% or lower when entering this phase, it will be skipped)

  • Ibex will enter into this phase by once again chasing players around the set piece, but this time charging into the nearest player and firing an almost unavoidable wall of 5 (Arc Gap: 25o) Petrifying Stomp projectiles. Whichever player is then closest to him will fall victim to getting near sat on (although he will actually stand 0.5 tiles away) and hit with a possible 2 (Arc Gap: 40o) Hoof Stomp projectiles while letting off an invisible Concussion Bomb AoE every 1.1 seconds whilst burying his sword into the ground 0.25 tiles in front of him (depending on the nearest player’s position).

    • Upon entering the ground, the sword will let off a singular Sword Shockwave AoE, and then fire radial bursts of 3 (Arc Gap: 120o) Left Sword Slice projectiles - with shots alternating between North (000o) and South (180o).
  • Ibex will be swordless for 10 seconds. During this period he will become vulnerable (though still armored). He will then chase players around and repeat all oh his attacks from phase 1.


Phase 7 - Pillars of Destruction (3) image0image0
This Phase lasts until 6 (already destroyed 4 + 2 additional pillars) out of 7 pillars are destroyed.

  • Again, it will begin this phase by following players around the arena at a close proximity for 2.5-10 seconds and then suddenly charge at the closest one without indication or warning. If any player is within a 3.75 tile range to it, it will let off a Small Shockwave Explosion and a Large Shockwave Explosion AoE (which is centered on itself) that have the combined ability to inflict Unstable and Confuse players for 2.5 seconds each.

  • Players must work together to lead the boss into charging into one of the seven pillars arounds the set piece, this means the closest player(s) to the boss must stand in front of a pillar to make him charge into one. If he collides with one of the pillars, he will enter recovery and be vulnerable for 5 seconds. At the same time the bottom block will be replaced with a destructible block that will be vulnerable for 5 seconds also. When the destructible block is eventually destroyed, a Pillar Block AoE is thrown atop the boss which causes the boss to lose its Armored status and the vulnerability will be increased by an additional 7.5 seconds (on top of the vulnerability from the boss ramming into one of the pillars, so if timed right, players can get a total of 12.5 seconds to attack the boss).
    If the phase is pulled off perfectly, players can gain a small upper hand across the battle as a whole because players can push the boss into a lengthy total of 25 seconds of vulnerability within this phase.

    • Each time players go through this phase, it will end after 2 pillars have successfully been destroyed. (So 6/7 must be destroyed in order to proceed to the next phase)
    • Note that if the boss rams into a pillar, but that pillar remains intact after the boss has been damaged, it will heal him for 1250 HP and then disappear without throwing the Falling Pillar Block AoE onto him.
    • There will be another sword that is uncovered from underneath one of the two pillars that are destroyed within this phase, a combination of both swords will be used in later phases and the battle will become far more hectic.

Phase 8 - Deadman’s Volley image0image0
This phase will last until Ibex is finally brought down to 30% HP.

  • Ibex will spawn his Magma Energy Sphere entity and then hurl it in the direction of the nearest player. Since it only travels at 2.1 tiles/second it’s not too much of a threat to players while travelling, however since the Molten Explosion AoE spans across an enormous 21 tiles in diameter and deals 175 damage, if it explodes at the end of covering the entire distance, it can be lethal.

  • When thrown, the Magma Energy Sphere will fire 1 Molten Energy projectile in a completely random direction every 0.2 seconds. Though they do small damage individually, because of the rate at which it fires them, the damage can quickly stack and lead to a very quick death. Therefore it is advised to refrain from getting close to it. Furthermore, if a player gets within a 2.5 tile radius to the Magma Energy Sphere it will let off a radial burst of 10 (Arc Gap: 36o) Molten Blast projectiles, which also have a cooldown of 3 seconds, so this should also be taken into consideration too.

  • The way to deal with this phase is to deal as much damage (starting with 1750 damage if one player is present during this phase) to the Molten Energy Sphere within a 5 second timeframe to force it to travel back in the opposite direction (while it travels back it will become invincible and will not register shots until it is deflected back towards players). Once it reaches the boss, the boss will attack it and it will come back towards the player. The player will once again need to deal a set amount of damage within the timescale, this time though, the energy ball will become 0.3 tiles/second faster (giving players only 4.375 seconds to deal the set amount of damage to it).

    • The travel speed for the energy ball will increase by 0.3 seconds every time it is hit back, reducing the duration players will have to deal the sufficient amount of damage to it.
    • Ibex is able to deflect it from 3-7 times and the amount of times he hits it back is purely based on Random Number Generation (RNG).
    • Ibex will also remain stationary for the entire phase, so the only threat to focus on will be the energy ball itself.
    • Ibex will fire 4 Molten Bolt projectiles (each being grouped in pairs - pairs having an arc gap of 20o - therefore having two being fired North (000o) and South (180o) and then firing East (090o) and West (270o) for the duration of the phase.
    • Ibex will fire 4 *Molten Sphere projectiles (Arc Gap: 50o) every 2 seconds, so don’t stand too close to him.
  • If players successfully deflect it back to Ibex without it exploding, it will end up exploding on Ibex instead and he will become vulnerable (also losing the armored status) for 5 seconds.


Phase 9 - The Final Pillar image0image0
This Phase lasts until 7 (already destroyed 6 + 1 additional pillar) out of 7 pillars are destroyed.

  • Again, it will begin this phase by following players around the arena at a close proximity for 2.5-10 seconds and then suddenly charge at the closest one without indication or warning. If any player is within a 3.75 tile range to it, it will let off a Small Shockwave Explosion and a Large Shockwave Explosion AoE (which is centered on itself) that have the combined ability to inflict Unstable and Confuse players for 2.5 seconds each.

  • Players must work together to lead the boss into charging into one of the seven pillars arounds the set piece, this means the closest player(s) to the boss must stand in front of a pillar to make him charge into one. If he collides with one of the pillars, he will enter recovery and be vulnerable for 5 seconds. At the same time the bottom block will be replaced with a destructible block that will be vulnerable for 5 seconds also. When the destructible block is eventually destroyed, a Pillar Block AoE is thrown atop the boss which causes the boss to lose its Armored status and the vulnerability will be increased by an additional 7.5 seconds (on top of the vulnerability from the boss ramming into the pillar, so if timed right, players can get a total of 12.5 seconds to attack the boss).

  • In addition to this, the boss will repeat the events of the entirety of phase 1, so be weary of keeping track of where ibex is.

    • To proceed to the next phase, the final pillar must be destroyed (So 7/7 must be destroyed).
    • Note that if the boss rams into a pillar, but that pillar remains intact after the boss has been damaged, it will heal him for 1500 HP and then disappear without throwing the Falling Pillar Block AoE onto him.
    • The combination of the two swords and more frequent attacks make this one of the hardest phases.

Phase 10 - End of the Beginning image0image0
This Phase will last until Ibex reaches 10% HP (if already below that from the previous phase, he will heal up to 15% and allow layers to take him on from there).

  • Ibex will have a fusion of most of his previous phases (excluding the ‘Pillars of Destruction’ phases and the ‘Final Pillar’ phase).
    Since a lot of those phases are spent within invulnerability, instead Ibex will transition in and out of being invulnerable. Ibex will be invulnerable for 10 seconds periods and then become invulnerable again for 2.5 seconds in his recovery state, before switching to the a random sub-phase.

    • The Prophetic Blade phase will this time involve two sword attacks (left and right) and the Pedestal Phase will instead involve two swords (where after he first being placed on an unfortunate player, Ibex will reposition and attack a different player).
    • In addition he will fire waves of 1, 2 and 3 (Arc Gaps between waves (not projectiles): 21o) Small/Medium/Large Molten Wave projectiles, with the addition of a Combined Molten Shockwave projectile at the end of a cycle (after he fires 3). - These attacks are not dependant of the sub-phases he performs, so players must be careful as the damage from these attacks are too powerful to tank.

Once the boss reaches lower than 10% HP, he will turn into a stone statue in the center of the set piece and drop a lootbag in front of himself.

Additional Information

  • there will be randomized lightning strikes that occur around and on the set piece. Since they have no indication to where they will strike, it is quite hard to “be aware of your surroundings” due to the fact that players will be in the dark to when and where they will strike next.
    However, the lightning can also affect the boss by pushing him into recovery phases (thus rendering him vulnerable) for a 5 second period.

  • The fire seen around the outskirts of the arena can also throw the occasional bomb which spawns a trail of mini fires around the area, creating more hazards that players will need to pay attention to, otherwise they could be in serious danger and the battle would only become harder.


Set Piece Layout

Note: [Update: 22:37PM GMT, 06/03/2019. Setpiece layout added]


#4

Drops

LifePotion- G (3) Potion of life
RedLootBag" T13Weapon T13 Weapons T14Weapon T14 Weapons
WhiteLootBag" TheBeastsShendyt Prophetic Shendyt

Note: [Updated: 22:28PM GMT, 06/03/2019. Added Drop Table]


Special Thanks to:

  • @Lessking and @CrystalPX for helping me with criticism and opinions on sprites, helping me add outlines and shodows to the sprites and just being an honestly great help to me through the creation of this.

  • @Campfires for also being a massive help with opinions and listening to my never-ending ideas.

  • And then of course, @Xaklor for literally answering a billion questions. I know how annoying it can get, so I thank you for your patience and great helping-hand that you’ve leant me. I also appreciate the fact that you took the time to test some of the ideas that I had.

Also big thanks to everyone for taking the time to even so much as clicking on this thread. I know it’s a lot of content to read, but I appreciate any incoming feedback and I’ll be sure to take it onboard. please show me your support by liking the post so I can get a gage of how much everyone likes it.
Thank you everyone :heart:

(This was a huge post, taking up almost a month of planning, spriting and concepting + lore, so I had to split it into 2 (hopefully not 3 lol) posts because I almost exceeded the character limit by double)

P.S: Turns out it took four (64,555 characters used ) :sweat_smile:


#5

I’ve just creamed, I’ll show myself out.


#6

Holy shit, this is amazing.

Mixture of attack patterns, concept itself is cool, fully fledged out without too many phases that are left to the imagination (you detailed them very nicely).

Probably haven’t seen a fight more complete and even complex than this one on these forums. You could probably just rip this straight into the game without any changes.

Keep it up man.


#7

Epic. Thank you for breathing a bit of life back into this withered subforum!

and I think all hoofed mammals hereafter should count towards Oryx kills ^o^


#8

It’s a reference to the lore…nudge nudge, wink wink


#9

okay but what are shendyt stats


#10

what are the prophetic shendyt’s stats?


#11

@Kirkoma and @TheGalin, I’ll make a seperate post on it soon and link it here, but this post is focused on the boss and its mechanics to keep all of the feedback and comments related to the #ideas:dungeons-enemies category.


#12

wut


#13

Wow, I was not expecting this much detail when I clicked on the page. Didn’t read all of it because there’s so much content, but I think it is a nice idea so far with interesting sprites. You and your helpers have my applause. :clap: Also I feel that at least one more white should be added to spice up the hype to take on the Ibex


#14

YWow is all I can say, :clap: Good Job


#15

this will probably sound insensitive, but my initial reaction is:

S M H

because I know I’ve already told you about a bunch of this stuff I’m about to post here yet again:

these rocks should inflict uniform damage for two reasons: 1) their sprites are much too similar to justify making players keep track of different forms, especially when the only time players are going to see these sprites is in the air spinning quickly. 2) randomized damage has no place in this game when randomly taking a bit of extra damage can have severe and permanent consequences. DECA has already taken steps to actually remove variable damage from places that have it, don’t put it back in pls.

this isn’t okay. under no circumstances is it justifiable to randomly paralyze players without warning in a super-endgame boss fight with permadeath consequences. even if it did pure damage I would still scrap it because randomly taking damage out of nowhere is still too much

image

what happened to the old flame sprite :c

1 minute 45 seconds of doing absolutely nothing O_o

half of which the boss isn’t doing anything either? o_O

I told you that you can shorten that by having the guy pull himself out of the ground while the lava transitions. I would still reduce the wait time to 10-15 seconds total, and have the boss lose invulnerability after about 5 more seconds so you can hit him during this phase.

I told you that having projectiles offset in front of an enemy is also “too sketchy” territory, since the potential for projectiles to spawn out of nowhere on top of players is very real.


now for the new stuff:

image

I don’t care how endgame your dungeon is, that’s too much damage.

why not just use AoE? it’s less janky, and you can disable the particles for it if you want it to look like contact damage.

you can cheese the entire fight by having the boss ram a pillar to stun itself so you can hit it, but then not hit the pillar after he crashed into it.

he also fires exactly 0 projectiles during this phase, making him even easier to defeat in this phase.

wait what sword

wait what 675 damage projectiles

also this one has the same problem as the last one, you can kill him by getting him to ram a pillar and then not hitting the pillar.

what makes these “amost unavoidable”? avoiding them seems almost trivially easy to me, there’s only 5 of them and their projectile speed isn’t anything particularly incredible.

that said, why do you think it’s fair to have your beast dude sit on and nearly perma-paralyze anyone who happens to get hit by “almost unavoidable” paralyzing projectiles?

not again :/

you’re thinking of Ganondorf, not Ganon ;P

You might have left stuff out somewhere, but this is what I’m hearing:

“this thing repeatedly blasts everyone in the room and they can’t do squat about it, but that’s okay because it moves slowly!”

also it’s not possible to have Ganon Ibex bounce the fireball back towards players without making the Nest’s XML look like the most organized thing ever. To be fair, this entire fight would be a nightmare to recreate and would probably be Nest-tier anyway, but this phase would be even messier than that if not actually impossible.

what swords? what frequent attacks? this phase looks identical to the other 3, which is to say: nearly harmless.

this is the one with paralyze yes? paralyzing a player followed by a point-blank double sword attack is guaranteed death regardless of set, that’s too much damage.

something worth noting: this is indeed 100% doable, but since no one will ever be able to land a killing blow to the guy no one will ever earn that “Oryx Kill” you’ve decided to slap on this guy for some reason.


despite my beefs with several unfair bits of the fight, this actually looks like a very simple fight. if you want to know what I mean, take a look at some of the MBC phases and check out all the crap that’s going on there. doesn’t really seem a “T14 weapon” dungeon to me.

I did? I don’t remember doing that. believe me I’d definitely remember if I tried doing something with this fight because I’d hate myself a lot more than I do already.

next time make a google doc and then share the link.


#16

You just forgot one thing…

@Krathan


#17

I know you told me this lol, but initially it was a 200 damage difference between the stongest and weakest one. I hope that a 20 damage difference is acceptable now, I don’t mean for it to be unfair. I just wanted to make it a little more interesting by slapping various damages on them so you’re not always taking plain 180’s. If it is a concern rasied by more people, I can remove it.

It was harder to animate and I wanted to make a flame that was a little more realistic in movement.

He fires a projectiles that will travel along and projectiles will only “spawn” under it. However, as you had told me I might as well just make an entity that fires projectiles itself.

If that’s what the fire uses in the forbidden jungle when you sit on it too, this can be altered.

Actually, I already thought of this, so if you don’t destroy the block it heals the boss and disappears instead.

I forgot to add the fact that he’ll fire those hoof stomp projectiles and throw rocks about when he runs during this phase too.

Left Sword Slash

I know, I’ve beat both of them twice.
I just thought that the addition of a phase like this is foreign to the game, so I added something new and interesting to the mix.

Yeah, you read it wrong then.
It only explodes if it reaches the 10.5 tile distance (initially), so if players are really that weak and can’t deal the damage neccessary within the given timeframe, then it’ll explode.

If it’s not possible to have enemies move in certain directions in a straight path based on damage taken, and then the opposite direction again once another enemy gives a “signal” once within range, then I’ll have it like this:

  • It is thrown by the boss, players must deal a set amount of damage.
  • Once damage is dealt it will spawn another energy ball and send it back to the boss and then self-destruct. When it reaches the boss again. Another faster one will be thrown and the previous will self-destruct.

Yes, it will involve quite a bit of coding, sadly I don’t have access to anywhere to test out XML so I can’t create too many alternatives without them being “in-theory” type deals.

Left/Right Sword Slash.

He’ll only drop one sword at a time on players, so if there are multiple players, it’s likely two would be targetted (one after the other). Though I’ll still alter the nechanics of this phase.

If he were to self-destruct after spawning a stone statue, amd give the oryx kill to the person who dealt the most damage the Oryx Kill, would that be possible?


It isn’t complicated at the moment for the purpose of showcasing more iteresting fight mechanics, rather than complex shot patterns.

As I did tell you a while ago, this is more or less based on atmosphere and unique boss functions, rather than being bullet hell.
It more or less forces players to be aware of their surroundings as there’s fire, lightning and a boss that basically chases you constantly to take into consideration.

This doesn’t mean I’m closing myself off to changing it, because it’s far from perfect.

Not with the phases, but the transparent tile layer that spawns over the set piece.

I’m already working on that, I just have to redo all of the tables since I formatted them for HTML here.

The google doc will contain visual aids, boss hit sounds, death sounds amd miscellaneous sounds played when in different states.
I’ll also include a list of which projectiles are used in which phaseses, etc.

But for now it’s easier for everyone to just click on the post and read the contents without having to download any documents and then comment their thoughts.


    • I think I remember you saying that the projectile speeds weren’t that high, in the case that I was an idiot amd confused myself, I halfed all of them. So if they’re unbearably slow, they should be double the speed that I’ve stated them to be.

#18

Underappreciated insult criticism :’)


#19

Lmao so this is what you were working on this entire time


#20

Bro, there is so much here, I got class, Im definitely reading this at some point though. This looks fuggin great.