
It occurred to me recently that no one seems to know how to use Mystics and that that might be why no one likes them, so I spent way too much time making a full guide to Mystic, including how to best use stasis. Be prepared for a long reading.
Introduced in Build 65, the Mystic was implemented in the game to be the most resilient class, with incredibly high Defense and low Speed. Like the Wizard, he was equipped with a sword, a orb, and heavy armor. The shield originally did nothing but provide a DEF boost. In Build 96, the Mystic was given access to the MP and Wisdom stats with which to use the newly implemented orb bash ability. Build 97 gave Wizard his own unique ability, making the orb exclusive to the Mystic. In Build 113, his base DEF stat cap was nerfed slightly, to the cap it stands today. In that same build, the Mystic’s graphics were altered slightly to reflect his use of the orb.
Today, the Mystic is commonly thought of as one of the strongest classes in the game, owed to the fact he can possess the highest natural defense stat of all classes. Mystic is a short range attacker, relying on his high defense stat and his equipment to make it easier to get close to enemies. The Mystic also possesses strong burst damage with his star, to compensate for the lack of being able to buff his own DPS with the sword. To unlock Mystic, reach level 18 with Samurai. You can find his stat gains, caps, and averages here.

Stats and Equipment
The most exceptional stat Mystic possesses is a defense cap of 25, and this DEF cap is exclusive to everyone. Mystic’s exact same natural DEF stat allows him to tank heavy damage that would make even a coward flee to safety. In addition, like the Ranger, he has a high vitality cap of 75 and shares the highest health capacity of 675 (average) and 770 (cap) before additional bonuses. The former provides Msytic with high health regen only with a pet, and his health capacity gives him superb survivability with the combination of his high DEF. However, his other stats are not particularly noteworthy; his attack, speed, dexterity, and wisdom all cap at 50. Msytic’s stats and equipment make him one of (if not the ) most resilient classes in the game. Keep in mind, DEF will only block up to 85% damage of any single shot. This means that each shot will still do at least 20% of its damage. A high DEF does not equal invincibility.
Weapon
The Msytic’s weapon of choice is the sword. Swords provide high damage output, but have a very short range. The Msytic’s high defense and stasising ability makes sword range much less problematic for Msytic than it would be for Wizard or Niegel. You may want to refer to this guide for a more comprehensive comparison of all the practical swords available.
![]()
![]()
![]()
![]()
![]()
![]()
The Skysplitter Sword (Sky) and Sword of Acclaim (Acclaim) are the best tradable tiered weapons for the Msytic, with high damage output up to a range of 3.5 tiles. The Sword of Splendor (Splendor) is slightly more powerful, but as a drop from the endgame-level Void Entity, it is a very rare and exclusive tiered sword.
![]()
The Crystal Sword (CSword) has its nice uses for the Msytic. The extra range of 4.5 tiles allows the Msytic to hit an enemy without getting too close to it, which can be useful when the Rogue is unable to use his cloak. The Crystal Sword is great against dungeon bosses in certain phases, and can be used for mob control. This should be considered for the Rogue’s arsenal as well, as it has several practical uses, although its DPS is much lower than that of a tiered sword. This sword can be dropped by the Crystal Prisoner.
![]()
The Demon Blade (DBlade) is an awesome sword on the Rogue. This should be your main weapon if you’re concerned about damage per second. Although each individual shot is weaker than the CSword, it fires two shots spread out at a 40° angle. This sword can outdamage most other swords if you can get both shots to hit. But its dual shot nature means that it will be more affected by enemy defense than other swords. While its “true” range is only 1.37 tiles, Rogue is the best equipped class for getting close to enemies and is thus the ideal class to use this sword. This sword can be found in the Abyss of Demons.
![]()
![]()
![]()
![]()
![]()
![]()
The Ancient Stone Sword (A.S.S.) is an in-between of tiered swords and the CSword. It does the second most damage of any sword, has a lower rate of fire, and has a range of 4 tiles, longer than tiered swords but lower than CSword. The Stone Sword does not do more DPS than the Acclaim does in most situations. However, it still has a great utility by quickly dealing damage to a boss, with a few high-power shots, and rushing back. It is therefore best to use this sword when a boss has several enemies surrounding them dealing high damage, or if it is almost impossible to stay near a boss without taking a lot of damage. While this sword works very well for a Wizard, the same can not be said for the Rogue; Rogues usually have a high enough defense and have the ability to invisible enemies, making the extra half-tile range afforded by the A.S.S. less advantageous. On the other hand, the sword is powerful enough to sometimes kill certain smaller enemies in a single hit that would otherwise survive a hit from a tiered sword. This sword is dropped by the Stone Guardians.
The Pirate King’s Cutlass (Cutlass) is dropped by Jon Bilgewater. It boasts a higher ![]() rate of fire and high projectile speed as well as a SPD boost, in exchange for a small DEF reduction and lowered base damage. The Cutlass is strong on Roguw, outdamaging the Acclaim until 93 DEF and the Splendor until 70 DEF. Note,
rate of fire and high projectile speed as well as a SPD boost, in exchange for a small DEF reduction and lowered base damage. The Cutlass is strong on Roguw, outdamaging the Acclaim until 93 DEF and the Splendor until 70 DEF. Note, ![]() however, that along with the range being reduced to 3.3 tiles, the kiting range of this sword is also hampered because the projectile speed is significantly increased. The -2 DEF penalty is of little concern for Rogue in particular, given
however, that along with the range being reduced to 3.3 tiles, the kiting range of this sword is also hampered because the projectile speed is significantly increased. The -2 DEF penalty is of little concern for Rogue in particular, given ![]() his high natural DEF.
his high natural DEF.
![]()
The Pixie-Enchanted Sword (Pixie) is very similar to the DBlade. It fires a narrow spread of four pink bolts with a true range of 1.87 tiles, slightly longer![]() than the DBlade. In addition, with a maximum range of 4.55 tiles, the Pixie has the longest range of all swords. This sword is extremely effective at killing crowded enemies and the range helps it to clear a lot of enemies at a certain distance; it is also a great weapon
than the DBlade. In addition, with a maximum range of 4.55 tiles, the Pixie has the longest range of all swords. This sword is extremely effective at killing crowded enemies and the range helps it to clear a lot of enemies at a certain distance; it is also a great weapon![]() for killing gods in the godlands. It is also more powerful than the Demon Blade against enemies up to 3 defense. However, because this sword fires four shots, it is more affected by enemy DEF than other swords; the Demon
for killing gods in the godlands. It is also more powerful than the Demon Blade against enemies up to 3 defense. However, because this sword fires four shots, it is more affected by enemy DEF than other swords; the Demon![]() Blade will very quickly become more powerful as DEF adds up. A tiered Sword would be more preferable for DPS against enemies with above 40 DEF. This sword pairs very well with the Cloak of Ogmur (which will be mentioned later).
Blade will very quickly become more powerful as DEF adds up. A tiered Sword would be more preferable for DPS against enemies with above 40 DEF. This sword pairs very well with the Cloak of Ogmur (which will be mentioned later).
![]()
The Sword of the Colossus (Colo Sword) is a unique sword acquired as a rare drop from the Marble Colossus. ![]() This sword has a 4.5 tile range and an extremely high base damage, outdamaging all tiered swords and many other untiered swords with few exceptions.
This sword has a 4.5 tile range and an extremely high base damage, outdamaging all tiered swords and many other untiered swords with few exceptions.![]() However, the shots of the sword curve outwards and inwards before truing up at the end of the range. This makes it much more difficult to hit shots in the middle of its range; the shots may simply move around the enemy if you aim directly toward them. This sword takes time to master, but its high DPS and longer
However, the shots of the sword curve outwards and inwards before truing up at the end of the range. This makes it much more difficult to hit shots in the middle of its range; the shots may simply move around the enemy if you aim directly toward them. This sword takes time to master, but its high DPS and longer![]() range over a tiered sword makes mastering it worthwhile.
range over a tiered sword makes mastering it worthwhile.
![]()
Oryx’s Greatsword (Greatsword) is a unique sword that is filling in the new worlds, great! It’s fairly straightforward and at least as much fun as grinding for pots or dying from lag! (No, seriously, you do feel a sense of accomplishment after finishing a map.)
1. Identify the current world
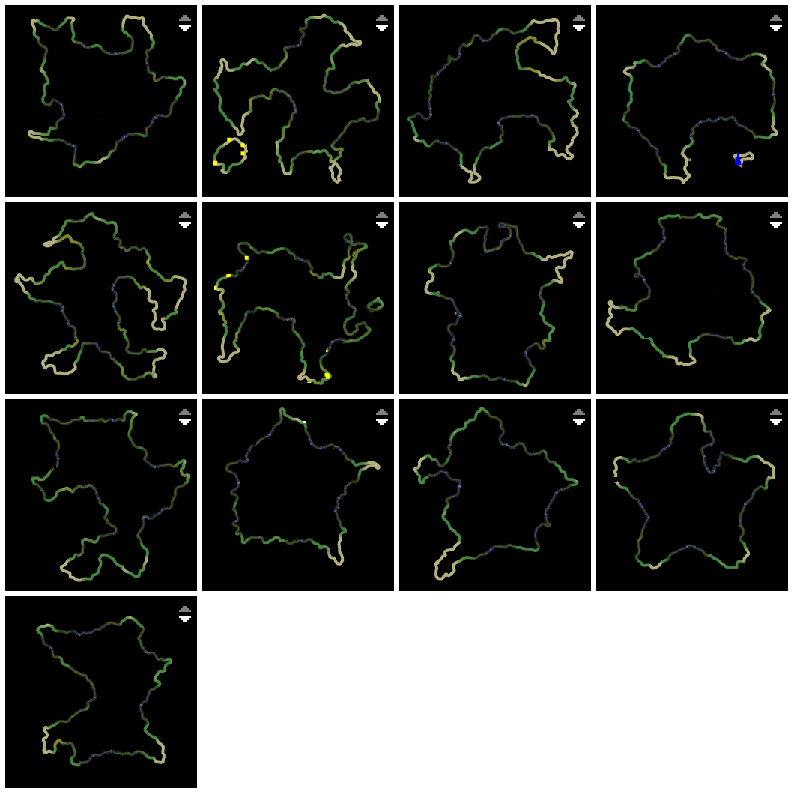
Ask in-game if anyone knows what “world” you are currently in. There are supposedly 20 maps at the moment though we only have evidence of about 15. If no one knows, try to identify it from the maps on the wiki (You Are Here). Run along the coastline for a couple of minutes, then zoom your minimap all the way out and compare to the existing maps.
If the coastline definitely doesn’t fit any of the existing maps, then congratulations! You’ve discovered one of the unmapped worlds!
Alternatively, you can run inland to the first road and then run along the road (far faster than moving in and out of water tiles). Compare the minimap you created to the minimaps in the Racetrack file.
2. Explore and take screenshots
Once you know what world you’re in, look at the current wiki map and choose an area that’s not mapped. If you’re exploring a new world, it’s best to follow the coastline and the edges of the map, and take note of any reported god locations.
Then, in-game, zoom out all the way using ‘Minus’ key and go reveal that map! Diagonal running in an orderly fashion works best. Don’t die! Don’t F5 if you can help it, and don’t enter any dungeons; you’ll lose your map. Save a screenshot every few minutes so that if your browser crashes, you’ll still have something.
To save a screenshot, zoom your minimap out all the way so it shows the whole world, then push the Print Screen key. Paste it into your paint program and save it. (In MS Paint, create a new image, paste, then save as PNG or BMP. In Photoshop/GIMP, paste, make new layer.)
3. Add your screenshots to the map
It’s best to use a layer-capable image editor such as Photoshop or (free) GIMP. These will allow you to take the current map file (grab below on this page, in a zip file) and add the data you reveal on top of it. If you’re not sure if you’ve processed your screenshot properly, just leave it as a separate layer and someone else can check it later. Put any markings for gods and things in a separate topmost layer (called “overlay” in many of the work files) so they stay visible but don’t damage the underlying map image.
If you can’t or don’t want to do this, just upload your screenshot(s) to this wiki page, and someone else such as Mappy or Boo can add in your data to the map. Leave a note here so we don’t miss it.
Files that need to be processed: Screenshots of NWorld1,NWorld2,NWorld3 (new worlds) and also of World10 and World14 (Posted by Deep Thought, living at EUSW).
If you’re mapping a new world, please feel free to make the map using MS Paint if that’s all you have. Something’s always better than nothing.
4. Publish the map
Crop the image down to just the map (it’ll be 184 x 184 pixels). Save as PNG. Go to the maps page on the wiki, edit, upload your new image, and change the src= URL to your uploaded file.
Happy mapping!
Details and tips
Tips for GIMP 2.6.4 by Mappy:
Paste your screenshot directly into GIMP, and make it a new layer.
Select by color (shift-O) on the black area. Delete.
Toggle visibility of your new layer on and off to help line it up.
If you want to crop your layer (e.g. you want to update only a certain part of the map), rectangle select the area to keep, Layer / Crop to Selection. Or: select an irregular area to keep, Select / Invert, delete.
The following are things I like to do to make the image look a bit nicer, because I’m a little bit obsessive. Please consider these totally optional .
Erase the blue player arrow and the green ally dots. (Color select blue arrow, delete, etc.)
Erase darkened edges: The border of your revealed minimap area will have darkened pixels when it’s zoomed out. This gets ugly pasted onto an existing map image, especially if you have a narrow path overlayed on a large previously-mapped area. Toggle layer visibility on and off and look for dark pixels, then erase them in your layer.
Erase the zoom arrows (select contiguous region (U), delete). If there’s land behind them, fill it in by zooming in a couple of levels, taking a shot, then shrinking it to the map scale. (If you zoom in two steps, scale it to 36%.)
Fill in black water areas with dark blue. I think this makes the map easier to “read.”
Tips for Photoshop CS3/4 by Boo (CS5 has a free trial now, I havent used it but it’s usu similar):
Open your screenshot and marquee (M) just the black square that is the minimap.
Go to Edit > Crop to remove everything that isnt map.
Open the wiki’s map in PS, and make your map a new layer. They should be the same size but if not line them up.
Select > Color Range on the black area. Erase all the black.
The following are things Mappy likes to do to make the image look a bit nicer, because hes a little bit obsessive. Please consider these totally optional.
Erase the blue player arrow and the green ally dots. (Color select blue arrow, delete, etc.)
Erase darkened edges: The border of your revealed minimap area will have darkened pixels when it’s zoomed out. This gets ugly pasted onto an existing map image, especially if you have a narrow path overlayed on a large previously-mapped area. Toggle layer visibility on and off and look for dark pixels, then erase them in your layer.
Erase the zoom arrows.
Fill in black water areas with dark blue. I think this makes the map easier to “read.”
Trick for capturing large areas at full resolution
From AllPurposeNerd:
- Walk a large area and end up somewhere relatively safe, where you can stand still for a few minutes without being killed.
- Zoom the minimap to the second highest level (i.e. zoom all the way out, then zoom in one click)
- Right click on roughly the center of the minimap, and click Zoom In.
- Zoom in again.
- Take screenshot.
- Right click, Show All.
That’s how I get such large pieces of the pixel-for-pixel minimap at once. They still have to be carefully pieced together, but it’s way easier than working with 184 pixel blocks.
Map work files
These .psd files are Photoshop files; GIMP can edit them too. Note that the wiki won’t let you upload a .psd file. Put it in a zip file first. To keep the file size down, please crop the image down to just the map and the gray border around it (to make it easier to align new screenshots). (Rectangle select around that area, Image / Crop to Selection.)
If someone else is mapping at the same time, before you start changing the map file, make a note here with your name and the file name so the other person will know to wait.
Files currently being edited: none